

Introduction
There were a few projects in the last year that just didn't work. Mostly because they were too ambitious and I did not have enough time and pacience to finish them. So I finally wanted to build a robot that just works without any gimmicks.
Electronics
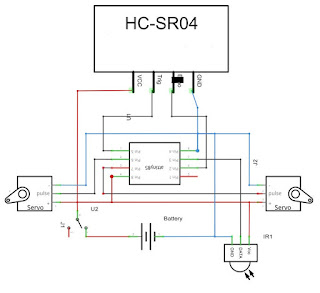
The main part of the robot is an Atttiny85 again.
The servos are two HXT900 from Hobbyking:
http://www.hobbyking.com/hobbyking/store/__662__HXT900_9g_1_6kg_12sec_Micro_Servo.html
I removed the potentiometers and the end stops, so that they are continuously rotating.
http://www.hobbyking.com/hobbyking/store/__662__HXT900_9g_1_6kg_12sec_Micro_Servo.html
I removed the potentiometers and the end stops, so that they are continuously rotating.
I am using a 3,7V 600mAh LiPo to power both the Attiny and the servos. A small power switch disconnects the battery after use.
An HC-SR04 ultrasonic sensor enables autonomous driving to a certain degree.
To control the robot a 38kHz infrared receiver is needed as well.


Hardware
For the body of the robot I wanted to make use of my 3D printer. There are two half shells that hold the servos, the ultrasonic sensor and all remaining electronic components. These halves are connected by four screws. The holes are designed to fit the mounting screws that came with the servos. Both wheels are screwed into the servo shafts. The heavier parts like the battery need to be in the lower half to help the robot remain balanced.


The stl-files are available on Thingiverse:
Depending on your printer and servos you will have to sand the shells down a bit. The remaining electronical parts are then just hot-glued in.


Depending on your printer and servos you will have to sand the shells down a bit. The remaining electronical parts are then just hot-glued in.
Programming
This part was pretty simple as well, because I could reuse most of the code from my biped robot (http://coretechrobotics.blogspot.de/2013/12/an-attiny85-ir-biped-robot.html).
The Attiny will listen for infrared signals and moves the servos depending on what it receives.
I also built in an autonomous mode than can be activated by pressing a certain key on the remote. It simply drives forward until the ultrasonic sensor detects an obstacle, then it turns and drives on.
You can download the code from the Thingiverse page or directly from Dropbox:
https://www.dropbox.com/s/g5myobjc0wyziqw/Canbottiny_source.zip?dl=1
Keep in mind that this particular code may not work for you if you don't have the same Sony remote as me. You will have to change the codes at least, maybe it won't work at all.
Conclusion
As this robot was just supposed to be a qick weekend project, I am very happy with the overall outcome. A lot of people on Thingiverse seemed to like it as well and a few even built replicas. The only problem left is the balancing. If you want the robot to stay level while rolling, you will have to put some additional weight in the lower half.